Famous Brazilian “Pão de Queijo” (Gluten-Free Cheese Puff Bread) -Light Recipe

pao-de-queijo_cover

©2016 Food Cookture – Brazilian Pão de Queijo

Pão de queijo is eaten as a snack (or even as part of breakfast) throughout Brazil. These little “cheese puff breads” are also served alongside bread in certain restaurants (especially the “churrascarias” – Brazilian barbeque restaurants).

Originally from the region of Minas Gerais in Brazil, the traditional recipe uses a local cheese called “queijo minas” which is a mild white cheese with a medium consistency. When hard to find, most people substitute queijo minas with parmesan cheese which has a stronger flavor and harder consistency, while some also add mozzarella for the string cheese effect.  I tried different combinations and I prefer to use feta cheese and either pecorino or parmesan for a stronger cheese flavor.

brazilian-pao-de-queijo

©2016 Food Cookture – Brazilian Pão de Queijo

These little “breads” are easy to make and naturally gluten-free since tapioca flour is used instead of wheat. The dough usually keeps well in the fridge for about a week (mine has never lasted that long). You can also freeze the dough (see note below) but I prefer not to freeze them and make a fresh batch.

The traditional recipe uses oil (or butter), water and milk. I decreased the amount of oil and did not add milk. These are lighter in taste and fat content than most recipes. You can try different types of cheese and even add herbs and create your own version of pão de queijo!

Brazilian Pão de Queijo

©2016 Food Cookture – Brazilian Pão de Queijo

Famous Brazilian “Pão de Queijo” (Gluten-Free Cheese Puff Bread) – Light Recipe
Prep time: 10 minutes
Cook time: 10-12 minutes

Ingredients (approximately 50 small units)

  • 250g (approx 2 cups) tapioca flour (“polvilho”)
  • 60g (2oz) feta cheese
  • 60g (2oz) freshly grated parmesan* or pecorino cheese (or both)
  • 30ml (a little less than 4 TBL) vegetable oil (I use canola)
  • 160ml (3/4 cup) water
  • ¼ tsp salt (less if you use pecorino)
  • 1 egg, beaten
    • *NOTE: do not use store-bought packaged grated parmesan outside the refrigerated section of the supermarket as that is not fresh cheese and will alter the consistency.

Directions

  1. Mix the tapioca flour, cheese, and salt and set aside. The feta will easily crumble by hand once mixed into the tapioca flour.
  2. In a small sauce pan, boil the water and the oil. Carefully pour over the tapioca and cheese mixture and let the dry ingredients absorb the hot liquid for a few minutes. Then use a wooden spoon to mix until a dough is formed (it will become slightly cool to handle with your hands if you prefer to knead by hand, otherwise continue mixing with wooden spoon).
  3. Once the dough is cool, add the beaten egg and mix the dough with the wooden spoon (or by hand) until the egg is incorporated into the dough.
  4. You can either use the dough right away and spoon the mixture onto a baking sheet covered with parchment paper or a silicone mat; or once the dough is cool, you can store it in an airtight container in the refrigerator until ready to use. After a few hours (I prefer to leave it overnight) you can then shape the dough into small balls and bake.
    • Freezing the dough: Once you make the dough into balls, you can place them on a baking sheet and put in the freezer for about 20-30 minutes. When completely frozen, you can then place them in a freezer bag to store until ready to bake. If using frozen pão de queijo, be sure to increase the baking time.
  5. Bake at 400◦F (1200◦C) for 10-12 minutes (if using frozen dough, bake for 15-18 minutes. Keep an eye on the pão de queijo while in the oven, depending on the size you make them and your oven, you may need to adjust temperature and time. Be careful not to overcook them to “golden” or they will become dry.

I hope you enjoy this delicious and popular Brazilian snack as much as we do!

Advertisement
Posted in Appetizers, Breads, Brunch/Breakfast, Gluten-Free, Healthy Cookture, Light Dishes, Side Dishes, Snacks | Tagged , , , , , , , , , , , , , , , , , , , , , , , , , , | 2 Comments

Easy Homemade Tomato Sauce

post-33_cover_used-in-blog

© 2016 Food Cookture – Easy Homemade Tomato Sauce

Everyone needs an easy and basic tomato sauce recipe that can be tasty enough to be used alone over pasta yet simple enough that it can be incorporated with other ingredients in a more complex dish. This is an easy recipe that can be done in 30 minutes if you are rushed, but best if cooked for a longer time – 45 minutes to 1 hour.

This sauce can also be used as a base for tomato soup – just add more basil and a little more water (and omit the butter at the end). This recipe also freezes well.  I usually make a larger batch and freeze several containers so I always have homemade tomato sauce.

A note about the tomato base
Using fresh tomatoes of course is the ideal base for a homemade tomato sauce, but since the best tomatoes are seasonal, I usually use tomato passata (which is Italian tomato purée) for my sauce. Passata is uncooked, crushed and sieved tomatoes with no seasonings as you may find in store-bought tomato sauce. You can use canned tomatoes as long as you buy from a brand that is organic and free of the chemical BPA (bisphenol-A).

post-33_photo-2_used-in-blog

© 2016 Food Cookture – Easy Homemade Tomato Sauce

Easy Homemade Tomato Sauce
Prep time: 5-10 minutes
Cook time: 45 minutes – 1 hour (can be done in 30 minutes)

Ingredients

  • 2 jars of organic tomato passata/purée (approximately 24-oz/680g each jar)
  • 1 large onion, chopped
  • 2-3 large carrots, chopped (sweetens the sauce and turns it orange)
  • 1-2 celery stalks, chopped
  • 3 garlic cloves (more if you prefer)
  • Bunch of fresh basil
  • Pinch of dried oregano
  • Pinch of dried rosemary, optional
  • Bay leaf, optional (not to be blended)
  • Salt and pepper to taste
  • Olive oil
  • 1-2 TBL (14-28g) Butter, optional

Directions

  1. Chop onion, carrots, celery and garlic, reserve. Note: if you want to spend less time cooking the sauce, be sure to chop the carrots and celery into smaller pieces.
  2. Using a tall pot, sauté onions, carrots and celery in a few tablespoons of olive oil in low to medium heat until onions are translucent, but not burned. Add garlic and continue stirring until garlic is light golden in color (be careful not to overcook garlic or it will make the sauce bitter).
  3. Add the tomato passata and measure 1 of the jars with filtered or spring water.
  4. Add salt and pepper, and dried seasonings if desired (oregano, rosemary and bay leaf). Bring the sauce to a boil then simmer (covered but not completely) for at least 45 minutes, best for 1 hour (the longer it is cooked, the better it will taste). Stir frequently.  If you want to make the sauce in 30 minutes, you will need to let the sauce cook in medium to medium-high heat, but will need to stir more frequently.  Cook until carrots and celery are soft enough to be blended. You can also leave the pan uncovered to cook down the water faster, but will need to stir frequently and keep an eye on the sauce not to splatter all over your stove.
  5. Remove the bay leaf if using, and add fresh basil leaves. Using an immersion blender, blend all ingredients (do not blend bay leaf). If you don’t have an immersion blender, transfer all the ingredients in batches to a kitchen blender (leave the small top off the cover to let out the hot steam while blending). Transfer back to the pan.
  6. Season with more salt and pepper, if needed, and add butter. At this point you may cook the sauce for a longer period of time if desired. The butter adds richness to the sauce and helps balance out the acidity (taste-wise) of the tomato, another little trick is also to add a teaspoon of sugar – but cooking it for a long time also helps.
  7. It is now ready to be served. Wait until sauce is completely cooled before storing in the refrigerator or freezer.

I hope you enjoy making this easy tomato sauce and use it in many of your favorite recipes!

Posted in Entree (lunch/dinner), First Course, Gluten-Free, Healthy Cookture, Light Dishes, Pasta, Sauce, Soups, Vegetarian | Tagged , , , , , , , | Leave a comment

How to Make a Nutritious Smoothie (3 Recipes) – Como Fazer uma Vitamina Nutritiva (3 Receitas)

(Receita em português abaixo)

food-cookture_how_to_make_smoothie_cover

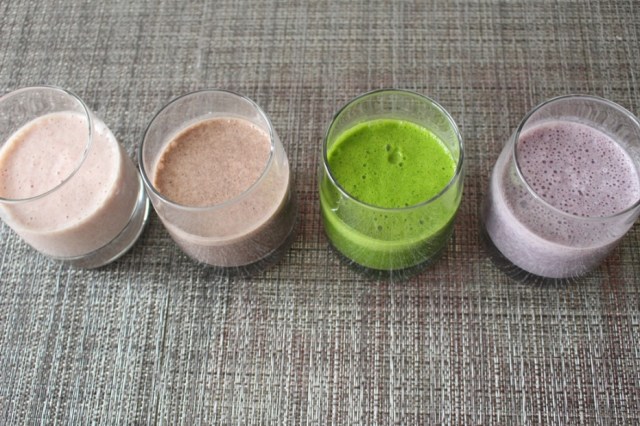
© 2016 Food Cookture -Various smoothie recipes (strawberry, chocolate, green, blueberry) / Várias receitas de vitamina (morango, chocolate, verde, e blueberry)

A great healthy smoothie can be made up of foods you enjoy to eat. A “super healthy” smoothie doesn’t necessarily have to be “super foods” you can’t pronounce or things you don’t enjoy.  Nor does it have to taste unpleasant.  I prefer to use as many healthy foods as possible in my smoothie, but I will admit my favorite recipe is somewhat of an acquired taste.  I will show you how you can start with a basic recipe and build up to some more “potent” recipes for when and if you feel ready to increase the nutritional value of your smoothie.

When I have a green smoothie first thing in the morning, I tend to crave less sugar and eat healthier for the rest of the day. I’ve also noticed I sleep better and my skin is more radiant.  If I don’t drink it in the morning before breakfast then I’ll have it as an afternoon snack.  I would not replace any of the recipes below for a meal as they are not substantial enough on their own to be considered a complete nutritious meal (unless you make sure to add enough protein to your smoothie).  Drinking a smoothie is also a great way to get a nutritious boost if you usually skip breakfast or don’t wake up hungry.  It’s fast and simple to make, and much easier to drink than to individually eat the same amount of ingredients.

The General Rule for a Smoothie Recipe
There’s no need for precise measurements, you can add as much or as little as you like of a particular ingredient or be as creative as you please. Just be mindful that the color (and taste) of certain foods may dominate the final result – if the color is important to you, start with smaller portions of certain foods until you see what they look like blended (I once made a gray smoothie but it tasted great); my husband doesn’t like to drink a green smoothie so I go heavier on the strawberries or the bananas.

food-cookture_how_to_make_smoothie_ingredients

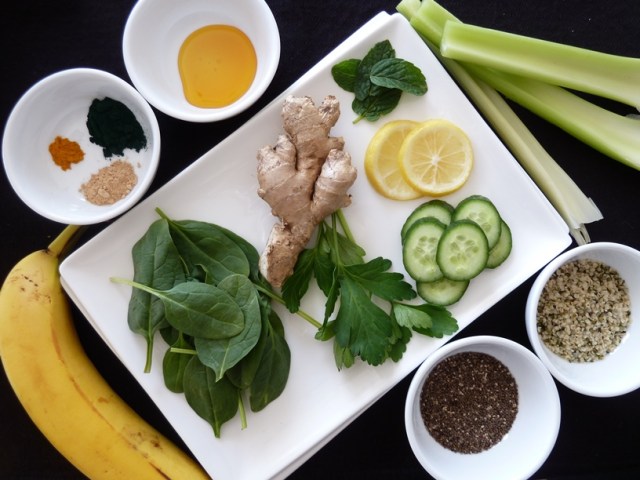
© 2016 Food Cookture – Green smoothie ingredients / Ingredientes para a vitamina verde

1. The Basic Fruit Smoothie
The basic fruit smoothie typically has bananas as a base which is great for making the smoothie creamy and sweet. You can add any other fruits and liquids (milk, water, almond or soy milk, coconut water, etc). You can also add some oats to make it heartier and thicker and some protein powder for additional nutrition.  For a nice starter recipe try the following (and add other ingredients as you please):

Banana Berry Smoothie (Serves 2):

  • 1 banana
  • 2-3 strawberries (fresh or frozen)
  • 1 TBL blueberries (fresh or frozen)
  • ½ TBL honey (optional if you want it sweet)
  • Milk or almond milk (enough to cover the fruits)
  • Other optional ingredients:
    • 1 TBL oatmeal
    • 1 TBL hemp seeds
    • Dash of cinnamon
    • Protein powder (chocolate or vanilla)

2. The Basic Green Smoothie
The basic green smoothie has any green fruit and/or vegetable in it. It is best to start with fruits and vegetables that are mild in flavor so that they blend well together.  I usually add water or coconut water as I don’t like to mix vegetables with any type of milk.

Basic Green Smoothie (Serves 2):

  • 1 banana
  • Bunch of spinach
  • A few slices of cucumber
  • Juice of ½ or 1 lemon or lime
  • ½ TBL honey (optional if you want it sweet)
  • Water or coconut water (enough to cover the ingredients)

3. The Super Nutritious Green Smoothie
For a more nutritious green smoothie, you can add the following ingredients as super foods to the basic recipe listed above: spirulina, chia seeds, hemp seeds, turmeric powder, maca powder, goji berries, and protein powder. I highly encourage adding the following ingredients for extra nutritious benefits, natural sweetening, and flavor enhancing: more fruit, fresh ginger, fresh mint leaves, basil, dates, and/or honey. These can be helpful to disguise the taste of strong flavored ingredients like spirulina.

Super Nutritious Green Smoothie (Serves 2):

  • 1 banana
  • Bunch of spinach
  • Bunch of kale
  • Small piece of fresh ginger
  • Fresh mint leaves
  • Juice of ½ or 1 lemon or lime
  • ½ tsp spirulina
  • 1 TBL hemp seeds
  • 1-2 tsp chia seeds
  • dash of turmeric powder
  • ½ TBL honey (optional if you want it sweet)
  • Water or coconut water (enough to cover the ingredients)
  • Other optional ingredients:
    • Protein powder
    • Cucumber slices
    • Apple
    • Pear
    • Beet (fresh)
    • Celery
    • Parsley
    • Carrot

Have fun experimenting and discovering your favorite recipe. Make small portions at first and don’t add too many ingredients until you know you like certain combinations!  Enjoy!

Receita em português:

Como Fazer uma Vitamina Nutritiva
Uma vitamina saudável pode ser feita de alimentos que você gosta de comer. Uma vitamina “super saudável” não tem que ser necessariamente feita de “super alimentos” que não você não gosta. Nem tem que ser de sabor desagradável. Eu prefiro usar o máximo de alimentos saudáveis na minha vitamina, mas confesso que minha receita favorita leva um tempo para adquiri gosto. Mostrarei como você pode começar com uma receita básica e montar algumas receitas mais “potentes” para quando estiver pronto para aumentar o valor nutricional de sua vitamina.

Quando bebo uma vitamina pela manhã, eu sinto vontade de comer comidas mais saudáveis e com menos açúcar o resto do dia. Eu também notei que durmo melhor e minha pele está mais radiante. Se eu não tomo antes do café da manhã, então eu geralmente tomo durante o lanche da tarde. Não substitua qualquer das receitas de vitamina abaixo por uma refeição, pois elas não são nutritivas o suficiente para valer por uma refeição nutritiva e completa (a menos que você adicione mais proteína na sua vitamina). Tomar vitamina também é uma ótima maneira de garantir uma boa dose de nutrição logo de manhã, especialmente se você costuma pular o café da manhã ou não acorda com fome. É rápido e simples de fazer e muito mais fácil beber do que comer individualmente a mesma quantidade de alimentos.

A regra geral para uma receita de vitamina
Não há nenhuma necessidade medir os ingredientes e você pode adicionar ou eliminar qualquer ingrediente, ou ser tão criativo como quiser. Apenas lembre-se que a cor (e gosto) de certos alimentos pode dominar o resultado final – se a cor for importante para você, comece com pequenas porções de certos alimentos até você ver o que eles parecem batidos juntos (uma vez fiz uma vitamina cinza mas estava deliciosa); meu marido não gosta de beber vitamina verde então que coloco mais morangos ou bananas.

1. Receita básica de vitamina de fruta

A vitamina básica de fruta geralmente tem banana como base pois torna a vitamina doce e cremosa. Você pode adicionar qualquer outra fruta e líquido (leite, água, leite de amêndoa ou de soja, água de coco, etc.). Você também pode adicionar aveia para torná-la mais substanciosa e um liquidio mais grosso, ou proteína em pó para aumentar o valor nutricional. Para uma receita básica, experimente o seguinte (adicione outros ingredientes se quiser):

Vitamina de Banana e Frutas Silvestres (2 porções):

  • 1 banana
  • 2-3 morangos (frescos ou congelados)
  • 1 colher de sopa de mirtilos/blueberry (frescos ou congelados)
  • ½ colher de sopa de mel (se quiser a vitamina mais doce)
  • Leite ou leite de amêndoa (o suficiente para cobrir as frutas)
  • Outros ingredientes opcionais:
  • 1 colher de sopa de aveia
  • 1 colher de sopa de sementes de cânhamo
  • pitada de canela
  • proteina em pó (chocolate ou baunilha)

2. Receita básica de vitamina verde (green smoothie)

Uma vitamina verde básica tem qualquer fruta ou verdura verde. É melhor começar com frutas e verduras que são leves de sabor, para que se misturam bem. Eu geralmente adiciono água ou água de coco porque não gosto de misturar verduras com qualquer tipo de leite.

Vitamina verde básica (2 porções):

  • 1 banana
  • Folhas de espinafre
  • Fatias de pepino
  • Suco de ½ ou 1 limão ou lima
  • ½ colher de sopa de mel (se quiser a vitamina mais doce)
  • Água ou água de coco (o suficiente para cobrir os ingredientes)

3. Receita de vitamina verde super nutritiva

Para uma vitamina mais nutritiva, você pode adicionar os seguintes ingredientes como “super alimentos”: spirulina, sementes de chia, sementes de cânhamo, cúrcuma em pó, pó de maca, frutinhas de goji, e proteína em pó. Também recomendo adicionar os seguintes ingredientes que tem benefícios nutritivos e são adoçantes naturais ou ajudam a realçar o sabor: mais frutas, gengibre fresco, folhas de hortelã fresca, manjericão, tâmaras e/ou mel. Estes ingredientes também podem disfarçar o sabor forte de certos alimentos como a spirulina.

Vitamina Verde Super Nutritiva (2 porções):

  • 1 banana
  • Folhas de espinafre
  • Folhas de couve
  • Pedaço pequeno de gengibre fresco
  • Folhas de hortelã fresca
  • Suco de ½ ou 1 limão ou lima
  • ½ colher de chá de spirulina
  • 1 colher de sopa de sementes de cânhamo
  • 1-2 colher de chá de sementes de chia
  • Pitada de cúrcuma em pó
  • ½ colher de sopa de mel TBL (se quiser a vitamina mais doce)
  • Água ou água de coco (o suficiente para cobrir os ingredientes)
  • Outros ingredientes opcionais:
    • proteina em pó
    • fatias de pepino
    • maçã
    • pera
    • betteraba fresca
    • salsão
    • salsinha
    • cenoura

Divirta-se experimentando e descobrindo sua receita favorita. Faça pequenas porções para começar e não adicione muitos ingredientes até que você saiba como certas combinações ficam! Enjoy!

Posted in Brunch/Breakfast, Drinks, Gluten-Free, Healthy Cookture, Light Dishes, Raw, Salads, Snacks, Uncategorized, Vegan, Vegetarian | Tagged , , , , , , , , , | Leave a comment

Healthy and Natural Pecan Pie (Raw, Vegan, No Bake)

food-cookture_healthy pecan pie_main-pic

Food Cookture – Healthy and Natural Pecan Pie

For the past two years I’ve been on a health(ier) kick researching and experimenting with natural recipes, raw foods, and vegan cooking. I’ve been drinking green smoothies almost every morning and have been trying to eat more plant-based foods whenever possible. I have not become a vegetarian or a vegan; nor have I adopted the macrobiotic, raw, or plant based diets. I have simply been more open to experimenting with recipes I would never have looked twice before. We have always eaten healthy foods at home, but ever since watching the documentary Forks Over Knives, my husband and I have been trying to eat more vegetables and plant-based foods. I have incorporated ingredients I had never tasted or heard of before, and I love this new discovery.

food-cookture_chocolate-cake_pic2

Food Cookture – Healthy and Natural Pecan Pie

Taste should never be compromised.
To me, how food tastes is just as important as how nutritious it is, because if something is super healthy but tastes bad, you won’t eat it anyway. So might as well make nutritious food taste good for you to continue eating it. However, keep in mind that your taste buds will eventually adapt to certain flavors, so don’t be quick to discard certain healthy ingredients or “power foods” based on taste alone.

About this recipe
Last Thanksgiving, I wanted to make a traditional pecan pie; one of the highlights of Thanksgiving for me. But when I read the many recipes and saw the list of ingredients, and saw how much sugar, corn syrup, and butter they require, suddenly I didn’t want to make the pie anymore, or ever eat it again. Fortunately, I found this recipe on Food52 that is a raw, vegan and no bake pecan pie that will make you smile. All the ingredients listed are healthy and naturally sweet. If you follow a raw or vegan diet, I guarantee you already have these ingredients in your pantry. If you don’t, I highly recommend having them for healthy snacking. The natural sweetener in this recipe is the Medjool date, which is considered the best and tastiest dates from the Middle East and North Africa. They are typically larger, fleshier, and sweeter than other dates. I substituted a mix of almonds and cashews instead of walnuts for the crust, but any combination of nuts works well. There’s no need to bake the crust or the pie itself, and it can be made ahead of time. I served it last year for Thanksgiving dessert and it was a success, so I’m repeating it this year. The best part is that the filling tastes just like the traditional pie (without the butter, sugar and corn syrup) and the crust is sweetly addictive on its own. You can leave this pie in your fridge for days… but I’m sure it won’t last that long. Likewise, you can make this recipe into pecan bars, or substitute the pecans for other nuts such as walnut.

food-cookture_chocolate-cake_pic3

Food Cookture – Healthy and Natural Pecan Pie


Healthy and Natural Pecan Pie
Recipe adapted from Food 52: Raw Vegan Pecan Pie
Serves 10-12
Prep time: 1 hour to soak dates, 10-15 min to prepare crust and filling, 2 hours to chill pie
Cook time: None

Ingredients – Crust

  • 3/4 cup (90g) raw pecans*
  • 1/3 cup (60g) raw almonds* and 1/2 cup (60g) raw cashews*
  • 1/4 teaspoon sea salt
  • 1/4 cup (20g) shredded unsweetened coconut
  • 1 cup (200g) pitted Medjool dates, packed

Ingredients – Pie Filling

  • 1 ¼ cups (250g) Medjool dates, pitted, tightly packed and soaked in warm water for at least an hour
  • 1/2 cup (60g) raw pecans* for the filling (plus 3/4 cup (90g) raw pecans* to decorate)
  • 1/4 cup (60ml) melted coconut oil (organic, virgin, cold-pressed and unrefined)
  • 2 teaspoons vanilla extract
  • 1 teaspoon cinnamon
  • 1/4 teaspoon nutmeg
  • Pinch sea salt

* Note: pecans, almonds, and cashews need to be raw which means they are not roasted or salted

Directions

For the crust:

  1. Put the pecans and any combination of nuts you choose (walnuts, almonds, cashews), shredded coconut, and salt in a food processor and grind (until coarsely ground, consistency of wet sand) Note: Careful not to over grind or the mixture may turn to nut butter! Use the pulse button of your food processor.
  2. Add the pitted dates and continue processing until the mixture begins to stick together.
  3. Press the mixture evenly onto the bottom of a pie plate or springform pan.

For the pie filling:

  1. Drain the soaked dates (reserve the water). Transfer to a high speed blender or food processor. Add the 1/2 cup (60g) of pecans, coconut oil, vanilla, cinnamon, nutmeg, salt and approximately 1/4 cup (60ml) of the water from soaking the dates. Blend until mixture is smooth.
  2. Pour the filling over the crust. Smooth the top and place in the fridge for at least 2-4 hours to set.
  3. Decorate with 3/4 cup (90g) of pecans and continue to chill until ready to serve.

I hope you enjoy this recipe and I already know you won’t miss the traditional pecan pie anymore, I know I don’t! :-)  Happy Thanksgiving!!!

Posted in Brunch/Breakfast, Cakes, Desserts, Gluten-Free, Healthy Cookture, Raw, Snacks, Vegan, Vegetarian | Tagged , , , , , , , , , , , , , , , , , , , , , , , | Leave a comment

Chocolate Cake (Low Fat)

Food Cookture_Chocolate Cake_main pic

Food Cookture just celebrated its 1st birthday!!!!

I’m so happy to share my passion for cooking with you through this blog and thank you all for your appreciation and support! For this occasion, I chose to bake a cake I always turn to when I crave chocolate (but don’t want to feel guilty for eating more than one piece): my low-fat chocolate cake. It’s a much lighter version of my good old chocolate cake that was accidently created when forgetting to add butter while I was multi-tasking in the kitchen.

Food Cookture_Chocolate Cake_pic2

About this recipe
I have been making a lighter version of my chocolate cake for years; each time tweaking the recipe a little to make it less caloric and lower in fat. I keep playing with the recipe and changing the amounts of sugar, butter, and milk to make it lighter. For this recipe, I accidently forgot to add the butter to the cake (what can happen when you cook four things at once!) and I only realized it after I put the cake in the oven…and that’s how my new low-fat version was created. The sugar has been decreased substantially; there is no butter or oil, instead I use skim milk (no fat) and eggs to moisten the cake. I mix unsweetened cocoa and low-sugar chocolate drinking powder to give a balance of intense chocolate and sweet flavors. I like to pour a light chocolate ganache glaze over it, but you can serve it with powdered sugar on top. No one has noticed that this cake is low-fat. For this recipe I baked the cake on a large baking sheet and cut out circles using a cookie cutter. I used the glaze in between layers (allowed it to set) and on top of the cake to achieve the cake pictured here.

Food Cookture_Chocolate Cake_pic3

Chocolate Cake (Low-fat)
Serves 8-10 (cutting 2 circles per serving; using rectangular 12×9 inch (30x23cm) pan)
Prep time: 10 minutes
Cook time: 30-40 minutes (depending on oven and baking dish used)
Cooking temperature: 350°F (180°C)

Ingredients – Chocolate Cake

  • 4 large eggs (separated)
  • 1 cup (140g) flour (you can always substitute for whole wheat flour)
  • ¼ cup (50g) sugar
  • ½ cup (30g) unsweetened cocoa powder
  • ½ cup (30g) chocolate drinking powder
  • 1 cup (250ml) skim (no fat) milk
  • 2 teaspoons of baking powder

Ingredients – Chocolate Glaze:

  • 2 Tablespoons (30g) butter
  • 5.5 ounces (150 g) of chopped chocolate (I used 72% cocoa, you can use 85% or 60% chocolate of your choice)
  • ¾ cup (165ml) skim (no fat) milk
  • 3 Tablespoons of heavy whipping cream (click here to see different types of cream) (you can skip the cream if you would like the recipe to be lighter; however the cream gives it a thicker consistency to the glaze).

Directions

  1. Beat the egg whites until fluffy; reserve.
  2. Beat egg yolks with sugar. Add flour, cocoa and chocolate powders, and milk until well combined. Gently fold in egg whites and baking powder.
  3. Butter and flour a baking dish (you may want to use wax or parchment paper –butter and flour it as well- depending on the dish, since this recipe has no butter or oil, it may stick to the surface of the dish). Bake at 350°F (180°C) for 30 minutes (until an inserted toothpick comes out clean from center); if needed, bake for another 5-10 minutes.
  4. For the glaze: Constantly mix the milk, cream and butter in a sauce pan over low-heat until it steams but does not reach a boiling point. Remove from the heat and add the chopped chocolate pieces and whisk until completely dissolved. Once the cake is cooled, pour chocolate glaze over the cake and decorate.

I hope you enjoy this recipe. Thank you once again for following Food Cookture for the past year! I look forward to sharing many more recipes with you for many more years!

Posted in Brunch/Breakfast, Cakes, Desserts, Healthy Cookture, Snacks, Vegetarian | Tagged , , , , , , , , , , , , , , , , , , | Leave a comment